
How To Add Gadget On Your Blog

Hola amigos! Wait wait don't translate your page yet, it is Hi friends in Spanish and usually Spanish use this word for greeting. Let get straightforward, today I will show you the how to add gadget on your blog, don't worry I will explain this to you 100% in English.
STEP 1
Go to your blog editing page, find and click on layout design on the left of your blog editing page.

STEP 2
Your display will change as shown as below and then you must click on add gadget.
STEP 3
When you click on add gadget, 26 type of gadget will appear but you should only choose one which is HTML/JavaScript.

STEP 4
When you click on HTML/JavaScript, the display will appear like this:

STEP 5
Then, open new tab to find HTML/JavaScript for the gadget that you want for example I want to add clock on my blog. So I chose Dayspedia.com as my HTML/JavaScript generator. In this site, first of all you must select your country GMT which is for Malaysia is GMT+8.

STEP 6
Then you can customs your clock and don't forget to copy the HTML/JavaScript on the bottom right side of the side.

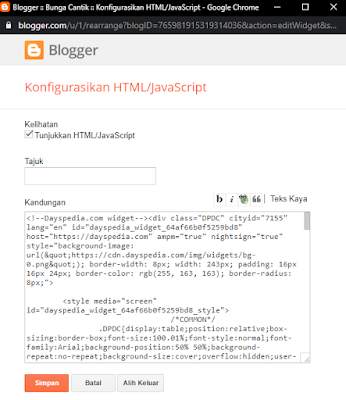
STEP 7
After you copy the HTML/JavaScript, you must paste it in HTML/JavaScript Configuration on your blog. As a reminder, dont forget to hit save button or else your work are in vain.
FINALE
Congratulations, you now have a clock on your blog.

I HOPE YOU CAN APPLY THIS KNOWLEDGE TO ENHANCE YOUR BLOG TOO
THANK YOU AND HAPPY BLOGGING


Soo nice babe 😍 thank you for sharing 🥰
ReplyDelete